Wednesday, December 25, 2013
Tuesday, December 3, 2013
Almost there!
I've started to get really comfortable with the feel and sounds of the Axe-fx now. I have made some disappointing discoveries, but almost all of them was because I did not understand the unit good enough. As an example I did not get the delay spillover to work at first. I enabled it but it did not work. After some reading I found out that it was not enough to enable delay spillover, you also need to set spillover behaviour on the actual effect in order to get it to work.
The only disturbing thing left now is that I still get a short delay when changing between some scenes. I don't like that at all. I would really like this switching to be instant without the short volume drop. I actually had the same problem in the "real" world with my ENGL-rig due to relay switching. But the volume drop during scene switching in Axe-fx is much longer, when it happens. When it does not happen the Axe-fx switching is seamless.
I don't fully understand what couses the slow switching between certain scenes, but I think one candidate can be switching between A-B Amp when changing scenes. A new firmware was released just recently so I upgraded the unit, but unfortunate the problem was not solved. The struggle goes on...
I have to go to bed now, so happy trails and see you later!!
Rock on!
Monday, November 4, 2013
Not dead!
Hi!
I just wanted to say that I'm still alive! I have been fully occupied with normal life stuff like home improvement, sickness etc. I've been rehearsing normally with my bands, but there has been no additional time for practice at home and improving my Axe-fx setup. Actually I have been using my old rig for rehearsals for a while. The idea was to improve the Axe-fx settings at home during this time. I have drastically improved the settings, but I need some more time to finish off the fine printed stuff. But now I have ran out of time... I will put out my old rig for sale shortly, so then I have to start using the Axe-fx actively again. You can fiddle around with this unit forever, so maybe it's time to say good enough and start to use it :-)
Please feel free to comment my posts! I still feel that I'm sending out messages into the void. Some feedback would be nice :-)
Rock on!
Friday, September 27, 2013
Axe-Fx II rig to the test
Hi there!
Long time no hear...
Now I have finally tested the new rig with our PA in rehersal a couple of times. I've spent the summer playing around with the unit and I set up the sounds using head phones at home. I can only say that the sound was totally different in the PA then in the head phones. The sound in the PA where much harscher and brighter. I also bought a fairly inexpensive active wedge monitor just to be on the safe side when it comes to hearing my own sound on stage and to be able to get my sounds with controlled feedback :-). It's a Laney CXP-112.

The Axe-Fx II sounded really good in this monitor. After just playing around with the Axe-Fx for a couple of hours I got a much better sound in the PA. I will continue to fiddle around with the settings to get an even better sound and search the Fractal Audio forum online for some insight.
Rock on!
Long time no hear...
Now I have finally tested the new rig with our PA in rehersal a couple of times. I've spent the summer playing around with the unit and I set up the sounds using head phones at home. I can only say that the sound was totally different in the PA then in the head phones. The sound in the PA where much harscher and brighter. I also bought a fairly inexpensive active wedge monitor just to be on the safe side when it comes to hearing my own sound on stage and to be able to get my sounds with controlled feedback :-). It's a Laney CXP-112.
The Axe-Fx II sounded really good in this monitor. After just playing around with the Axe-Fx for a couple of hours I got a much better sound in the PA. I will continue to fiddle around with the settings to get an even better sound and search the Fractal Audio forum online for some insight.
Rock on!
Friday, September 13, 2013
Fractal status
Hi!
Here's a little update on my process of changing rigs. Unfortunately I have still not been able to rehearse or gig with my new rig, I'm still using the old one. So why? Well, time has been the problem. I have not had enough time to setup the Axe-Fx the way I want it. There has been too much at work and I also had another gig that needed a little preparation on the musical side. Not much, but the time I had available for it was not much. I needed to learn some new songs and to brush up on the old ones as well and as you know, time flies when you are having fun. But now I have no gig with any of my bands planned for the near future, so I can take some time to fix my sound on the Axe-Fx. One thing I'm planning to do as quickly as possible is to cell my old rig. With the old rig gone I must put some time in finishing the sounds for my new one. Otherwise I will not be able to rehearse...
Rock on!
Monday, August 12, 2013
New rig decision
Hi!
I left out to tell you that I made the choice to replace my current ENGL-rig with a Fractal Audio Axe-Fx II and a MFC-101! After fiddling around with the Axe-Fx for some time I found it to really sound good and have almost no limitations with respect to my needs for effects. Really complex, but still easy to operate and configure. The MFC-101 was also very versatile and went hand in hand with the Axe-Fx in a really nice way.
So, now it's time to engineer my set of sounds I use and then try it out at rehearsals and live.
Rock on!
Wednesday, August 7, 2013
Renewing a guitar
Hi!
For a long time now I have been unsatisfied with my red Charvel guitar. It plays well, but I don't like the looks of it.
I have for a year or so thought about having it repainted. But I just recently stumbled on a post somewhere on the internet about someone who had changed his guitar's look using something called a guitar skin. I have never heard about it before, but I found out that there are several web shops that sells guitar skins, or wraps. You can select from a number of templates or design one of your own. Nice!
I found one company in Europe that sells guitar skins, Guitarskins.eu, so I placed an order there. Unfortunately Guitarskins.eu had gone out of business so I had to look further for a web shop with a nice guitar skin design. I found one called Wrap Edge. They make all sorts of wraps, not just guitar wraps. The problem, I thought, with ordering from an American company was the delivery time. But I got my wrap just eight days after placing the order! Really quick considering that they print out the skin after the order is placed. Good job Wrap Edge!!
Since I was eager to get my "new" guitar ready for the gig this weekend, I started with the application the same day I got the skin, i.e. yesterday. First I removed all the hardware. Unfortunately the EMGs in this guitar are old ones without the quick connector. Since I did not want to bother about soldering them loose, I left them "hanging" in their sockets.
I then positioned the wrap symmetrical on the body of the guitar, cut open small holes for the pickups in the wrap, placed the wrap on the guitar and pulled the pickups through the holes so that the wrap could rest on the body of the guitar. After that I removed the protection paper on the bridge side, cut it off with a pair of scissors and gently positioned the wrap on the body to anchor it. The rest of the protection paper was a little difficult to remove, but I managed to get it all off by removing and cutting it off section by section.
Fitting the wrap on the body without getting wrinkles or bubbles was a lengthy process. I was a little nervous that the wrap somehow would get destroyed by the constant putting on and taking off that was required, but nothing happened with it. Quality :-). I think the whole process would have been a lot easier if I had removed the pickups before applying the wrap. I also tried to get as much of the wrap to go over the edges of the guitar as possible, but I had to give up that idea. It was impossible. With that in mind I could have bought a smaller size. Never mind, I'm totally happy with the end result!!
The surface does not look good if you are really up close, but at a normal distance from the guitar it looks killer!!! I had to do a couple of small wrinkles on purpose between the pickups so that the rest of the guitar would be wrinkle free. In the end at a normal distance they are impossible to spot so that trick worked out fine. The small dots on the surface here and there must be because of my lengthy putting-on-and-off routine. So if you plan to do this and you are really fastidious, take your time and remove the pickups!
This was a really nice way to refresh an ugly guitar. Cheap and rather easy. I recommend!
Rock on!
For a long time now I have been unsatisfied with my red Charvel guitar. It plays well, but I don't like the looks of it.
 |
| The old look |
I found one company in Europe that sells guitar skins, Guitarskins.eu, so I placed an order there. Unfortunately Guitarskins.eu had gone out of business so I had to look further for a web shop with a nice guitar skin design. I found one called Wrap Edge. They make all sorts of wraps, not just guitar wraps. The problem, I thought, with ordering from an American company was the delivery time. But I got my wrap just eight days after placing the order! Really quick considering that they print out the skin after the order is placed. Good job Wrap Edge!!
Since I was eager to get my "new" guitar ready for the gig this weekend, I started with the application the same day I got the skin, i.e. yesterday. First I removed all the hardware. Unfortunately the EMGs in this guitar are old ones without the quick connector. Since I did not want to bother about soldering them loose, I left them "hanging" in their sockets.
 |
| First I removed the hardware |
I then positioned the wrap symmetrical on the body of the guitar, cut open small holes for the pickups in the wrap, placed the wrap on the guitar and pulled the pickups through the holes so that the wrap could rest on the body of the guitar. After that I removed the protection paper on the bridge side, cut it off with a pair of scissors and gently positioned the wrap on the body to anchor it. The rest of the protection paper was a little difficult to remove, but I managed to get it all off by removing and cutting it off section by section.
Fitting the wrap on the body without getting wrinkles or bubbles was a lengthy process. I was a little nervous that the wrap somehow would get destroyed by the constant putting on and taking off that was required, but nothing happened with it. Quality :-). I think the whole process would have been a lot easier if I had removed the pickups before applying the wrap. I also tried to get as much of the wrap to go over the edges of the guitar as possible, but I had to give up that idea. It was impossible. With that in mind I could have bought a smaller size. Never mind, I'm totally happy with the end result!!
 |
| The wrap in place with the pickups on top |
 |
| The final result! |
 |
| The final result a little closer. Can you see the wrinkles? |
This was a really nice way to refresh an ugly guitar. Cheap and rather easy. I recommend!
Rock on!
Monday, July 29, 2013
Current rig with pictures
Hi!
I showed you in a past post a connection diagram of my current rig. I will now complete the description with pictures of it.
Rock on!
I showed you in a past post a connection diagram of my current rig. I will now complete the description with pictures of it.
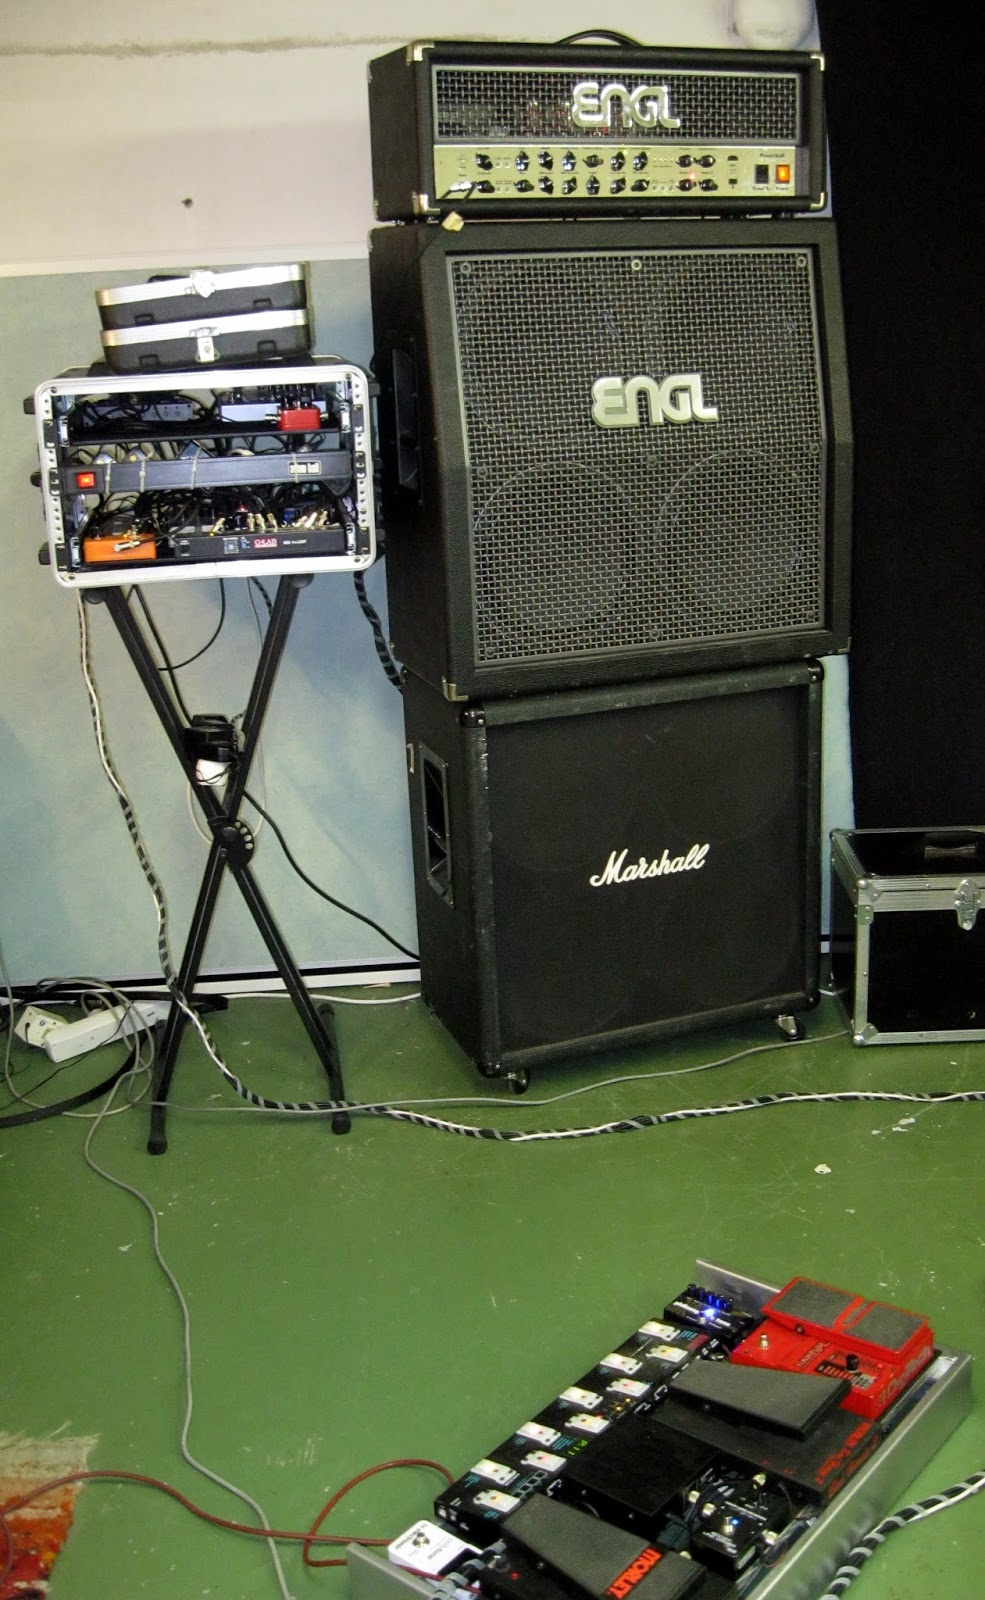 |
| The whole rig |
 |
| The pedal board |
 |
| The rack containing all gear not on pedal board |
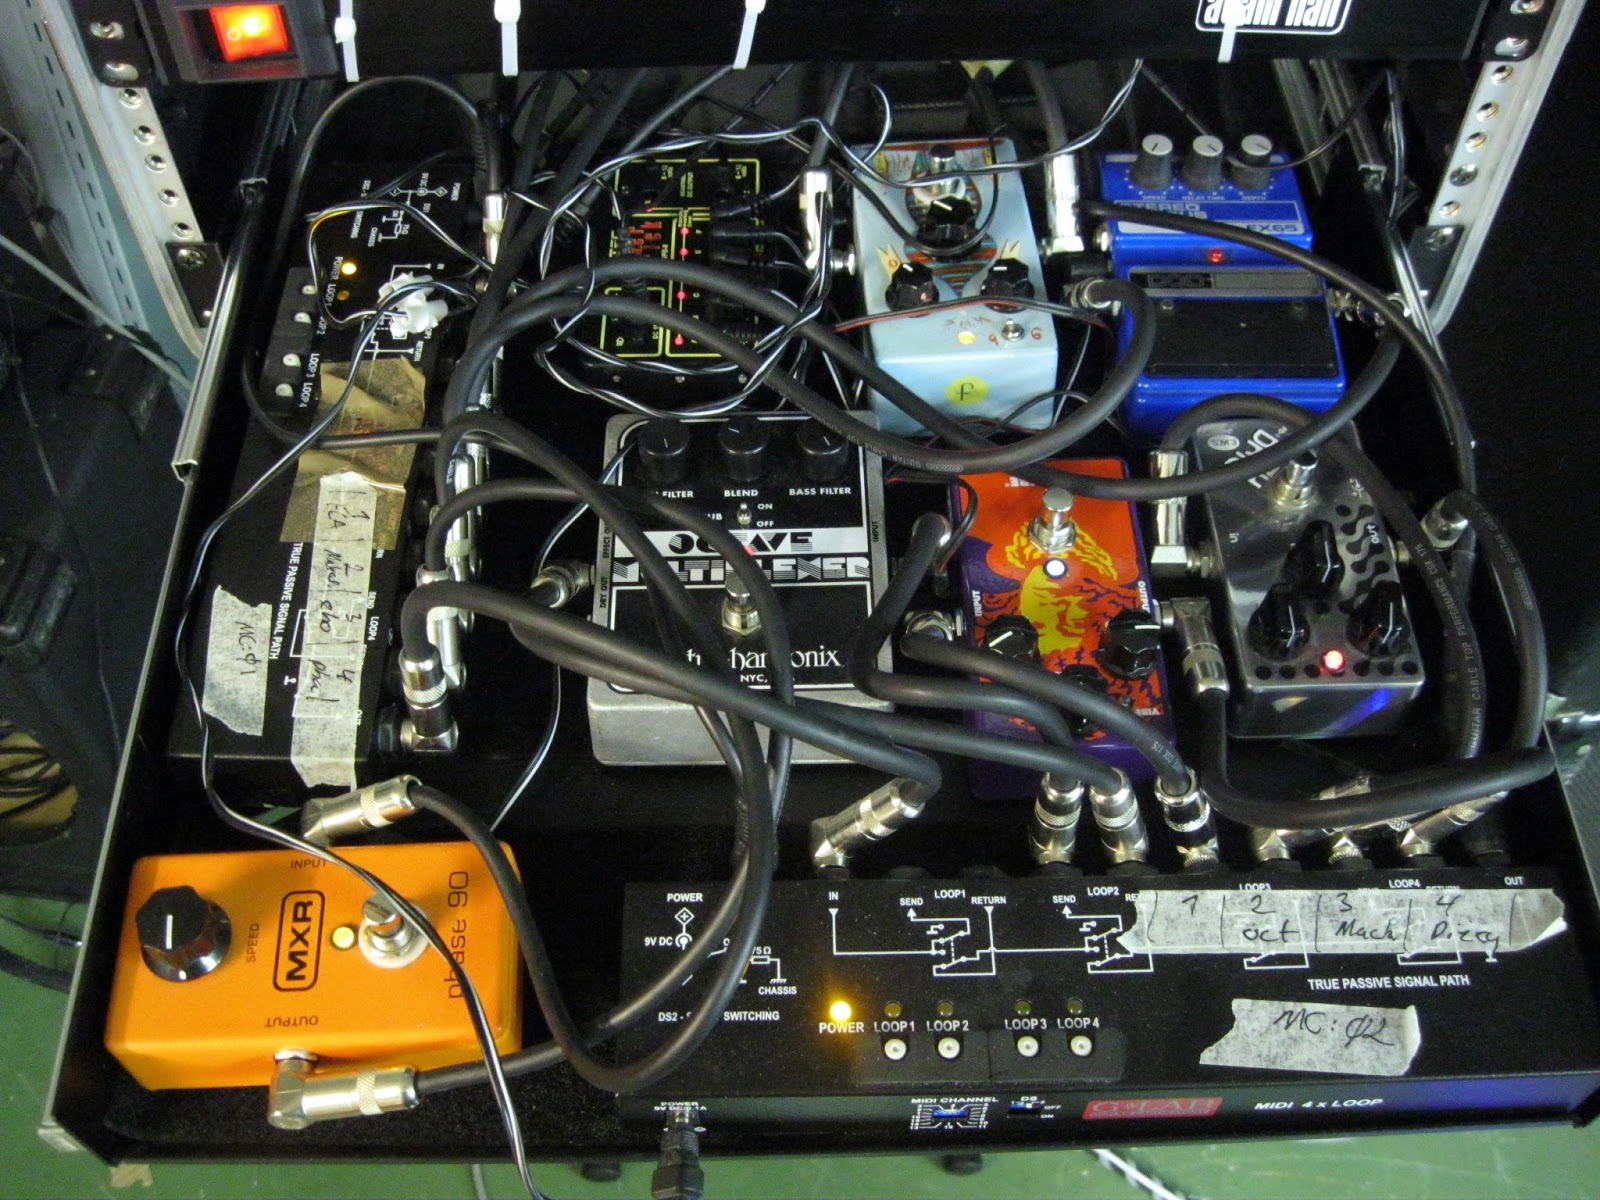 |
| First shelf contains pedals and swithers before the ENGL head. The wiring here is not so pretty :-) |
 |
| Second shelf contains an ampswitcher and pedals in the effects loop of the ENGL head. |
 |
| The almighty ENGL Powerball head :-) |
 |
| The ENGL cabinet |
 |
| The old Marshall cab I use to elevate the ENGL cab |
Rock on!
Saturday, July 27, 2013
Tremolo stabilizer
Hi!
Today I finally replaced the Göldo Back Box in my BC Rich with a Hipshot Tremsetter! As you might have seen I have always used the Tremsetter before, but I got curious about the Back Box. Read the whole story here.
This is how the Back Box looked installed:

First I removed the Back Box, springs, and the old spring holder. I then installed the Tremsetter springholders.

Then comes the scary part of the installation :-D. To be able to install the Tremsetter you have to drill a hole in the guitar.

This is how it looks when all is installed. The attentive reader can see that I changed the setup once during the installation. As the picture above shows I first installed the double spring holder and one of the single spring holder. This means that I had three springs in the setup. After test driving and adjusting I did not like the feel. It was to rigid. I therefore decided to remove one of the springs and hence you see only two singe spring holders in the following picture.

This is a close up showing the drilled hole and why you need that hole. The Tremsetter pin needs to go into the hole to fit into the cavity. The hole has to bee deep enough to swallow the pin when the whammy bar is lifted to the max.

Well, what can I say. Nothing beats the Tremsetter! I know that it is a little bit tricky to install and adjust, but if you know how to do it you end up with a really good whammy system. I like to have the tremsetter spring pretty much tightened so that the bending is fairly normal and uni bends requires no extra bend on the non bent note.This of cause requires more muscle to operate the whammy. But hey! I have no problem with that, I'm a viking!!

Rock on fellow guitarists, and the rest of you!
Today I finally replaced the Göldo Back Box in my BC Rich with a Hipshot Tremsetter! As you might have seen I have always used the Tremsetter before, but I got curious about the Back Box. Read the whole story here.
This is how the Back Box looked installed:
First I removed the Back Box, springs, and the old spring holder. I then installed the Tremsetter springholders.
Then comes the scary part of the installation :-D. To be able to install the Tremsetter you have to drill a hole in the guitar.
This is how it looks when all is installed. The attentive reader can see that I changed the setup once during the installation. As the picture above shows I first installed the double spring holder and one of the single spring holder. This means that I had three springs in the setup. After test driving and adjusting I did not like the feel. It was to rigid. I therefore decided to remove one of the springs and hence you see only two singe spring holders in the following picture.
This is a close up showing the drilled hole and why you need that hole. The Tremsetter pin needs to go into the hole to fit into the cavity. The hole has to bee deep enough to swallow the pin when the whammy bar is lifted to the max.
Well, what can I say. Nothing beats the Tremsetter! I know that it is a little bit tricky to install and adjust, but if you know how to do it you end up with a really good whammy system. I like to have the tremsetter spring pretty much tightened so that the bending is fairly normal and uni bends requires no extra bend on the non bent note.This of cause requires more muscle to operate the whammy. But hey! I have no problem with that, I'm a viking!!
Rock on fellow guitarists, and the rest of you!
Wednesday, July 24, 2013
Second impression
Hi!
I can only say wow!! I found the key to the amp simulations in the Axe-Fx. I did not realize how close this thing is to a real rig. I experienced no real anger in the amps the last time, but what I just found out was that the master volume on the virtual amps sometimes was really low. And when I turned it up it worked exactly like it would irl, i.e. anger comes :-D. This discovery really changed everything!! Now I'm trying amp after amp with a cobstant smile on my face. I mean it's really awsome to dial in a modded plexi running on full throttle without disturbing the neighbours... This is fun! I must continue now ...
Tuesday, July 23, 2013
First impression
Hi again!
After unpacking the Axe-Fx and reading the quick-guide included from G66.eu, I hooked up the unit together with the MFC-101. Since we have a puppy in the house that needs supervision, I had to invade the office upstairs.

The sound system in this office is worthless. But this room is okay anyway since I can use my headphones, which is altogether a much better solution due to the late hours of testing :-)
Since the people at G66.eu already have configured the MFC-101 and the Axe-Fx for me it was very easy to get the system up and running. The only problem I had was with the expression pedal, it did not work at all. I used one of guitar chords to connect it to the MFC-101. After doing some reading in the manual (!!) I found out that you must use a TRS-cable, i.e. stereo cable, so that was probably the cause of the problem. I will buy a short TRS cable today and then it will probably work just fine.
I played through all the presets, all 383 of them!!! Turning effects on and off for every preset and listening. It was a tough job, but someone had to do it! After this I realized that you can build a huge variety of sounds with this babe. Normal and very natural sounding sounds can be accieved but also very complex and spacey ones. The effects sounded really nice but the crucial question to me was, can it really simulate a tube amp sound with the accurate playing feel? If it cannot do that I will keep my ENGL Powerball amp, so it better! The amps in the presets where nice, but non of them really delivered that slightly compressed sustain and fat mid tone for solos that I get from my Powerball. So the next step was to investigate the amp section further.
I tried some of the 83 amp simulations and looked at all the massive number of parameters that existed for each amp and fiddled with some of them. When I selected an amp it sounded rather good from start, but more nice then kick-ass-angry! Could the rest of the parameters provoke the amp in some way? Well the only way to find that out was to get an understanding for what the parameters did and try it out. So then I shut the thing off, grabbed the manual and headed outside in the Swedish summer with the dogs and read!
To be contined.....
Sunday, July 21, 2013
Comment!
Hi!
Please feel free to comment on my posts. I see that someone is reading them, but I would love some feedback!
Rock, and comment, on!
Please feel free to comment on my posts. I see that someone is reading them, but I would love some feedback!
Rock, and comment, on!
Testing of a new rig!
Hi!
I know I just the other day explained to you about my current guitar rig. Even though I did not include any pictures I'm pretty sure that you will believe me when I say that my current rig is rather large and weigh some heavy kilos :-(. I have also realized that so many components wired together makes a very sensitive system. Hum sometimes becomes a problem at some places and reassemble the rig after transporting easily makes it malfunctioning. And since it's a complex setup finding the error might take long time even though the error might be of simple character. Having said that, I love the sound of my rig and I think it's worth the hassle. But what if I could have the sound and the versatility of my rig and at the same time somehow get rid of the hum problems and the sensitivity of the connections.
What about a good multieffects unit you might say. Yes, I've thought about that several times. But after testing, or just reading the manual, I've every time discovered two major problems.
BUT! I stumbled on a multieffects unit a couple of years ago that claimed to have the tube amp feel covered in their simulations. It also claimed to have no restrictions what so ever about the order of the effects. A lot of effects where also covered, and not just the most common ones. The only problem was the prize tag :-(. It was, and is, a much more expensive unit than any other multieffects unit on the market.
Since I first discovered it I have seen that more and more people have started to use it. New models have also been introduced to the market that further enhances the experience. As you might have guessed I'm talking about the Axe FX from Fractal Audio.
The newest model Axe Fx II Mk2 looks really good on paper, but I have not heard it irl. There exists a lot of youtube movies that shows how good it sounds, and I agree with them. But still, you need to try one out to hear how it really sounds like and how it feels like playing it. In Europe there is only one distributor and they are selling it on the web, so trying one out in a store is impossible here. But the distributer in Europe, G66, has the policy that if you buy a unit and don't like it, you can return it. There sometimes exists some used Axe Fx units on ebay-like sites here in Sweden. But then I'm talking about the older versions. The version II Mk2 are twice as powerful as the old version, has a new more sturdy connector for the cable between the midi controller and the Axe FX and it acts as a sound card for you computer as well. So to be able to replace my ENGL Powerball it has to be good, so the version II it has to be.
A couple of days ago I received this:
So the next step on the agenda is to try this baby out!! The first impression is that everything is really heavy duty when it comes to the mechanical design. Really robust and sturdy!! Unfortunately I have not been able to take this babe out for a test drive yet, so I cannot give you a review about the sound, feel etc..
Soo, I have to leave you now and hook this babe up and give it a try!! I'll be back with the details!
Rock on!!
I know I just the other day explained to you about my current guitar rig. Even though I did not include any pictures I'm pretty sure that you will believe me when I say that my current rig is rather large and weigh some heavy kilos :-(. I have also realized that so many components wired together makes a very sensitive system. Hum sometimes becomes a problem at some places and reassemble the rig after transporting easily makes it malfunctioning. And since it's a complex setup finding the error might take long time even though the error might be of simple character. Having said that, I love the sound of my rig and I think it's worth the hassle. But what if I could have the sound and the versatility of my rig and at the same time somehow get rid of the hum problems and the sensitivity of the connections.
What about a good multieffects unit you might say. Yes, I've thought about that several times. But after testing, or just reading the manual, I've every time discovered two major problems.
- The feel of playing it. I'm talking about the amp and cabinet simulations. Even though the virtual amps might sound fairly good it feels really strange to play them. There is some interaction between the guitar and a good tube amp that the simulation models just don't handle. To me it is really important how the amp feels. A good tube amp can inspire you totally with how it is boosting, sustaining and feedbacking your notes.
- I like to use effects in my sounds. Almost every multieffects unit I have looked at, until I gave up, have had some limitations when it comes to the order of the effects. The only effects I use after the gain stage in my amp are delay and reverb, all other effects are placed before the amp. An example: in the multieffects I've looked at they have placed all the modulation effects after the gain stage. I, and Eddie VH, use a phaser before distortion sometimes, that is impossible with these kind of multieffects. :-(
BUT! I stumbled on a multieffects unit a couple of years ago that claimed to have the tube amp feel covered in their simulations. It also claimed to have no restrictions what so ever about the order of the effects. A lot of effects where also covered, and not just the most common ones. The only problem was the prize tag :-(. It was, and is, a much more expensive unit than any other multieffects unit on the market.
Since I first discovered it I have seen that more and more people have started to use it. New models have also been introduced to the market that further enhances the experience. As you might have guessed I'm talking about the Axe FX from Fractal Audio.
The newest model Axe Fx II Mk2 looks really good on paper, but I have not heard it irl. There exists a lot of youtube movies that shows how good it sounds, and I agree with them. But still, you need to try one out to hear how it really sounds like and how it feels like playing it. In Europe there is only one distributor and they are selling it on the web, so trying one out in a store is impossible here. But the distributer in Europe, G66, has the policy that if you buy a unit and don't like it, you can return it. There sometimes exists some used Axe Fx units on ebay-like sites here in Sweden. But then I'm talking about the older versions. The version II Mk2 are twice as powerful as the old version, has a new more sturdy connector for the cable between the midi controller and the Axe FX and it acts as a sound card for you computer as well. So to be able to replace my ENGL Powerball it has to be good, so the version II it has to be.
A couple of days ago I received this:
 |
| A package from G66.eu! |
 |
| One expression pedal with spring load |
 |
| First package inside the package |
 |
| 10 m cable between the midi foot controller and the Axe Fx |
 |
| A network adapter and the MFC-101 midi controller |
 |
| The MFC-101 midi controller |
 |
| The next package inside the first package |
 |
| Another package inside that one. Well packed!! |
 |
| From Fractal Audio this also ;-) .... |
 |
| Take care of your customers! Make them feel at home! |
 |
| A letter with first name on |
 |
| A personal letter.... |
 |
| Finally the Axe Fx II Mk 2 unit |
 |
| The whole shipment! |
So the next step on the agenda is to try this baby out!! The first impression is that everything is really heavy duty when it comes to the mechanical design. Really robust and sturdy!! Unfortunately I have not been able to take this babe out for a test drive yet, so I cannot give you a review about the sound, feel etc..
Soo, I have to leave you now and hook this babe up and give it a try!! I'll be back with the details!
Rock on!!
Thursday, July 18, 2013
My guitar rig right now
Hi!
I mentioned before that I was planning to show you my guitar rig. So today I will do that.
The center of my guitar rig today consists of my ENGL Powerball 100 W head and my ENGL 4x12 standard slanted cabinet. I also have an old Marshall straight 4x12 cabinet at the bottom. I bought that just to have something to place the ENGL cabinet on so that I could hear it better. But I actually have it connected too. At my feet I have a pedal board with some pedals and a midi controller and in the back next to my amp I have a rack with two pull out shelves with some more pedals and the channel switcher for the amp. Almost everything is controlled by midi. Here is a schematic picture of the whole setup. I have disregarded the power supplies and all the power connections to make the picture readable :-).

On the pedal board all the signal cables are made with Lava Cable solder-free right angle pedalboard kits. That was a really nice and compact solution. All the wiring on in the rack is still done with normal right angle connectors soldered together by your's truly. This works but it is not by far as nice as the Lava Cable solution. I was thinking about replacing this wiring with Lava Cable, but it have to wait now of reasons I will tell you later.
So how do I use this? Well, as I mentioned before everything is controlled by the G Lab GSC-2. I'm not going to even begin to tell you how I programmed the whole setup, but this is how I use it. I use 8 pedals on the GSC-2 to change sounds and the other two to navigate between the different banks in the GSC-2. The different banks have almost the same sound layout, but some aspect is different. E.g. one bank uses fuzz for all distorted sounds and one bank has phaser together with distorted rythm instead of the octave below etc. This is the base for the layouts, my most used one.
 |
| Sound layout on the midi controller |
One additional function is the possibility to control the tempo of the delay. This is done by repeatedly tapping on the same footswitch in sync with the tempo of the song. It does not matter on which footswitch, but not one used for bank navigation. This means that the tempo of the delay can be set even when the delay is not used. Nice!
Okay, this was a short description of my guitar rig. Alot of things, but it sounds nice and I have a lot of sounds at my disposal.
Rock on!
Wednesday, July 17, 2013
Guitar status!
Hi!
I just wanted to say how I love my BC Rich. Feels good and looks good too:

I just have to find time to put in the Tremsetter. After that it will be perfekt!!
Rock on!
I just wanted to say how I love my BC Rich. Feels good and looks good too:
I just have to find time to put in the Tremsetter. After that it will be perfekt!!
Rock on!
Saturday, July 6, 2013
Another source of information
Hi!
Since I mentioned a YouTube channel for reviews here is another good one. David Wallimann has a really good channel here where he makes reviews, lessons and other nice to know information for a guitarist.
Since I mentioned a YouTube channel for reviews here is another good one. David Wallimann has a really good channel here where he makes reviews, lessons and other nice to know information for a guitarist.
Funny demos etc
Hi again!
I just wanted to hint you about a channel on YouTube. A guy called Rob Chapman does some really funny demos etc. Check it out! Here is the one that triggered this post.
Rock on!
I just wanted to hint you about a channel on YouTube. A guy called Rob Chapman does some really funny demos etc. Check it out! Here is the one that triggered this post.
Rock on!
Mockingbird modification
Hi there!
I just wanted to mention that I could not cope with the sluggish volume control on my Mockingbird anymore. It was actually a month ago or so that I replaced it with a much quicker one. It was impossible to quickly change the volume between more calmer and heavier parts in a song. If I had time there was no problem, but I found out that I seldom have that time in the songs. I probably could have started to lift some weights and train my finger strength or so ;-) but why bother when a much easier solution is available.
I ran out of battery during rehearsals a couple of weeks ago and when replacing it I also added another battery in series so that my EMGs now run on 18 V. I have that setup on a couple of my guitars and I like it. I was skeptical about this in the beginning, but I can actually hear a difference in headroom i.e less compressed sound. Even after my ENGL Powerball has chewed on the signal I still feel it. Okay, it's not a big difference, but it's there. I think I would not like the signal to be too dynamic either. I mean I love the sound I get out of the EMGs so why remove the characteristics from them. Running them on 18 V just enrich the sound a little bit, but the main character is still there.
The Mockingbird had a smart pocket for the battery so I had to add the other battery in the space for the electronics. So now I have two lids to remove when changing batteries :-(. You have to sacrifice yourselves for sound quality :-)
Have a nice summer everyone! If there is someone out there reading this???
I just wanted to mention that I could not cope with the sluggish volume control on my Mockingbird anymore. It was actually a month ago or so that I replaced it with a much quicker one. It was impossible to quickly change the volume between more calmer and heavier parts in a song. If I had time there was no problem, but I found out that I seldom have that time in the songs. I probably could have started to lift some weights and train my finger strength or so ;-) but why bother when a much easier solution is available.
I ran out of battery during rehearsals a couple of weeks ago and when replacing it I also added another battery in series so that my EMGs now run on 18 V. I have that setup on a couple of my guitars and I like it. I was skeptical about this in the beginning, but I can actually hear a difference in headroom i.e less compressed sound. Even after my ENGL Powerball has chewed on the signal I still feel it. Okay, it's not a big difference, but it's there. I think I would not like the signal to be too dynamic either. I mean I love the sound I get out of the EMGs so why remove the characteristics from them. Running them on 18 V just enrich the sound a little bit, but the main character is still there.
The Mockingbird had a smart pocket for the battery so I had to add the other battery in the space for the electronics. So now I have two lids to remove when changing batteries :-(. You have to sacrifice yourselves for sound quality :-)
 |
| New potentiometer and an additional battery! |
Have a nice summer everyone! If there is someone out there reading this???
Sunday, March 24, 2013
Have fun!
Hi!
I have not had time to publish for a while. I've been fully busy with life, working, rehearsing with my two bands and the yearly jam event. The jam event is actually two times a year, during the winter in my town and in the summer in my old friend's garage in the town in which I grew up. My friend is one of the first drummers I ever played with but he quit the band after some years and sadly we have been on different paths, when it comes to musicianship, since. But after some time of discussions during parties we finally succeeded in getting people from my old band and some other people I have played with together for a jam event. That was about five years ago. Since then we have continued with this event once a year for the first couple of years and then two times a year.
The general idea with these jam events is to have FUN!! We get together, discuss old and new times, drink beer and play whatever we feel like playing. In the beginning we where barely one person on each type of instrument but over the years we have grown in numbers both on and off the stage. The musicians come from different musical backgrounds and have different experiences of playing their instrument and of playing in a band situation. During the jam all participants have the chance to play songs that they may or may not know together with people that they normally do or do not play with. This can be scary to the newcomers but after a while it changes into pure fun if you let it. Since we all play songs that we do not know that well we all make mistakes the whole time, regardless of musical competence. This generates good laughs and as a result of that even more FUN!!
During the event we had just a couple of weeks ago I realized one thing. To have fun like we do during these events really drives the development of the creativity and self confidence for us as musicians. I mean, you realize that making mistakes is not so dangerous. This insight makes you take chances and try things you would not have tried otherwise. Of course you will make mistakes, but after a while you will not anymore (or at least more seldom). I mean you have to crash some times to be a good race car driver.
So finally, what I would like to say is don't forget to have fun! Fun is a really good driving force and it makes playing your instrument and life in general more... FUN!!
Rock on!!
Tuesday, February 26, 2013
The new pedal board
I told you a little about my old pedal board before and that I have built a new one. This is how that came to.
My old pedal board was quite nice, but there where some issues about it that bugged me. Somehow I did not get my pedals to stay in their places. At first I thought it was some problem with the material in the pedal board, but then I realized that I have used too small stripes of velcro and that dust and gravel seemed to creep in under the velcro and impaired the glue on the velcro. Another thing I was not happy about was that I somehow tended to change presets or set my rig in tuning mode, i.e. no sound, when I used my wha-wha or the whammy pedal. Either the board layout was bad or my feet was to big :-). Finally the cabling took up too much space on the board and was to stiff to handle nicely. Here is my old board:
 |
| My old board |
I looked around for a new pedal board but the size of most of them where to small to fit my pedals and the boards that where big enough where way to large instead. Hmm. What to do??
I then discovered be a coincident a post on a guitar forum that some guy talked about a project to build an own pedal board from an IKEA shelf :-S. I read the post and realized that this was not a bad idea, so I planned a little and then I went ahead and bought myself an IKEA shelf called Gorm. My wife's brother was kind to purchase a shelf for me at IKEA in Karlstad in deliver it to me. Thanx!!
 |
| Gorm from IKEA |
It was enough shelf for a couple of pedal boards if I wrecked the first board. I decided to go for a pedal board in two levels. That way I would not accidentally change anything on the pedals on the ground level when maneuvering the pedals on the balcony. Here's how the design turned out!
 |
| The new board without velcro |
 |
| The new board with velcro |
The design now was the smallest size possible for my pedals and to be able to do the wiring, I used two Lava Cable solderless kits. It worked great, but it was a little painful for my fingers during the assembling process. I'll use more tools the next time. It was also sometimes a little bit tricky to get good contact when assembling the contacts, but after a while it got easier. This was my first time I used the Lava Cable solderless contacts and it was probably therefore I had some problems, but it was all worth it. The space on the board taken up by the cabling was incredible small. Look at the picture below and compare it with the picture on my old board above. A much nicer result on a smaller total size and with a little more gear. Misa like!!
 |
| The new board |
Bye for now!
Rock on!!
Monday, February 11, 2013
TC Electronic G-Major
Hi again!
I will have to say goodbye to an old friend soon. I have had an ad out for my TC Electronic G-Major.

I have used it for several years together with my ENGL stack. In the beginning I used it for all effects. I controlled it via an old midi foot controller I had. Overall it sounds really nice and contains quite a lot of effects. But after a while a started to go further in my chase for my sound and I discovered that what I really liked when it comes to chorus effects was not what the G-Major could deliver. The G-Major is really good in delivering a nice, soft and transparent chorus sound. What I got a kick from was more of a heavier compressed over the top chorused sound.
So I went internet window shopping for a nice chorus pedal and find one that I really liked on youtube. An old DOD FX65 Stereo Chorus pedal.
Just what I was looking for in sound and I found a cheap old used one. I bought it and I just loved the sound. The pedal had not been used for a long time so the pots where almost stuck in their positions, but some electronic cleaning spray together with some heavy turning on the pots from zero to max cured that. The effect was placed before the amp, and therefore before my gain stage, since I thought it sounded better there. I don't use chorus on distorted sound (yet) so it had nothing to do with that, but it sounded somewhat better before then after the gain stage.
After the chorus a couple of more pedals replaced effects from the G-Major. Sometimes it was because of a special tone and sometimes because I wanted the effect before the distortion. For example, I have never really liked phasers because I have followed the general rule that says that you should have modulation effects after distortion. But I was really surprised when I first heard the sound of a slow phaser before distortion... The Eddie Van Halen sound! Yeah!!!
Conclusion: GENERAL RULES SUCK!! Don't listen to other people, i.e. except me, experiment freely with everything when looking for sounds.
After a while the delay was the only effect I was using in the G-Major and then I discovered the class of the tape echo simulations in the Strymon gear. Amazing not to say the least!. So now I have replaced the delay with a Strymon Timeline.
Goodbye! And have a nice rest of your life G-Major!
Saturday, February 9, 2013
Jimi-pedal!
Hi there!
Today I got delivered something I have been waiting to get my hands on for quite some time now. A Jimi Hendrix 70th Anniversary Tribute Series Univibe JHM3.

I had a univibe effect before when I had a VOX Tonelab LE. I liked the sound a lot, but since I have another setup now, with a stack and pedals, I have not been able to use the univibe for a while. I have not really looked around for one, but as I recall they are all quite expensive, rather big and they often require some strange voltage and often even AC power. But for a month ago or something I discovered this little pedal from MXR. A compact, cheap and, on youtube, really nice sounding unit.
Dunlop and MXR has released three anniversary tribute pedals to selebrate Jimi's 70th birthday. The Univibe, a Fuzz Face and an Octavio. This is a youtube video showing them all off.
The pedals are limited edition but I managed to get one of the last I guess, only 103 left :-).

I have not tried the pedal in my rig yet, but I managed to get a couple of hours with it connected to my somewhat smaller practice stack.
Verdict: I sounds awesome!! Can't wait to hook it up in my real rig.
Today I got delivered something I have been waiting to get my hands on for quite some time now. A Jimi Hendrix 70th Anniversary Tribute Series Univibe JHM3.
I had a univibe effect before when I had a VOX Tonelab LE. I liked the sound a lot, but since I have another setup now, with a stack and pedals, I have not been able to use the univibe for a while. I have not really looked around for one, but as I recall they are all quite expensive, rather big and they often require some strange voltage and often even AC power. But for a month ago or something I discovered this little pedal from MXR. A compact, cheap and, on youtube, really nice sounding unit.
Dunlop and MXR has released three anniversary tribute pedals to selebrate Jimi's 70th birthday. The Univibe, a Fuzz Face and an Octavio. This is a youtube video showing them all off.
I have not tried the pedal in my rig yet, but I managed to get a couple of hours with it connected to my somewhat smaller practice stack.
Verdict: I sounds awesome!! Can't wait to hook it up in my real rig.
Thursday, January 31, 2013
Pedal boards
Hi!
A new day with a new post :-). This time it's about pedal boards. I've been planning, working and testing for quite a while now with a new pedal board that I have built myself. I will tell you about that another day so let's start with the old board. This is it:
I don't know how much you know about guitar gear so I'll try to explain a little more in depth in my blog posts. Please don't hesitate to ask questions!
So, what is a pedal board? And why should you use one? In the beginning of one's guitar career the number of pedals used is not that many, if any. The first type of effect you buy is most likely some sort of distortion or overdrive pedal or a multi effect of some kind. At this stage the world is easy and the setup might look something like this:

That means that every time you set your guitar rig up or take it apart you simply place the pedal on the floor, connects one guitar cord from guitar to pedal input and another one from pedal output to amp input then you are done. Piece of cake :-). But if you are interested in creating different types of sounds and exactly getting the sound you want, it might soon start to look like this on the floor:

This will be much more cumbersome and slow to set up and take apart. A lot of cables that has to be connected together in the same order without the nobs on the pedals moving around and therefore changing the sound. It's also a good idea to start thinking about powering the pedals with some sort of power adapter instead of with batteries. The solution to all of this chaos is of cause the pedal board:

There exists many variations, but here is a common construction. The pedal board is some sort of hard board that is covered with velcro. The pedals are also covered with velcro on the underside. All the pedals are then layed out on the board and connected with as short connecting cables as possible. The order of the pedals is crucial for the sound you want and you have to decide during the mounting of the board. The pedals are then pressed to the board and slightly twisted so that the velcro on the pedal gets it's hooks into the velcro on the board. The power supply for the pedals is also normally fastened on the pedal board and connected to all the pedals. When the board is fully assembled you can turn it upside down, carry it around etc and the pedals will remain in their places. The board is then normally transported in a suitable case.
So the pedal board is, in principal, one big custom made multi effects pedal. Even though you now have a lot of sounds at your feet, it's still easy and quick to set up and take apart your guitar rig. You only need to connect one cord from the guitar to the input of the first pedal on the board, and one from the output of the last pedal to the amp. Now you also need to connect the power adapter to socket as well. Just one more cable!
And as usual you can complicate stuff even more, but I will not get into that now. Now it's time to sleep.
Rock on!!
A new day with a new post :-). This time it's about pedal boards. I've been planning, working and testing for quite a while now with a new pedal board that I have built myself. I will tell you about that another day so let's start with the old board. This is it:
 |
Digitech Whammy 4, Morley Bad Horsie 2 Wah, Morley PVO volume.
Electroharmonix POG 2, G-Lab GSC-2.
|
I don't know how much you know about guitar gear so I'll try to explain a little more in depth in my blog posts. Please don't hesitate to ask questions!
So, what is a pedal board? And why should you use one? In the beginning of one's guitar career the number of pedals used is not that many, if any. The first type of effect you buy is most likely some sort of distortion or overdrive pedal or a multi effect of some kind. At this stage the world is easy and the setup might look something like this:
That means that every time you set your guitar rig up or take it apart you simply place the pedal on the floor, connects one guitar cord from guitar to pedal input and another one from pedal output to amp input then you are done. Piece of cake :-). But if you are interested in creating different types of sounds and exactly getting the sound you want, it might soon start to look like this on the floor:
This will be much more cumbersome and slow to set up and take apart. A lot of cables that has to be connected together in the same order without the nobs on the pedals moving around and therefore changing the sound. It's also a good idea to start thinking about powering the pedals with some sort of power adapter instead of with batteries. The solution to all of this chaos is of cause the pedal board:
There exists many variations, but here is a common construction. The pedal board is some sort of hard board that is covered with velcro. The pedals are also covered with velcro on the underside. All the pedals are then layed out on the board and connected with as short connecting cables as possible. The order of the pedals is crucial for the sound you want and you have to decide during the mounting of the board. The pedals are then pressed to the board and slightly twisted so that the velcro on the pedal gets it's hooks into the velcro on the board. The power supply for the pedals is also normally fastened on the pedal board and connected to all the pedals. When the board is fully assembled you can turn it upside down, carry it around etc and the pedals will remain in their places. The board is then normally transported in a suitable case.
So the pedal board is, in principal, one big custom made multi effects pedal. Even though you now have a lot of sounds at your feet, it's still easy and quick to set up and take apart your guitar rig. You only need to connect one cord from the guitar to the input of the first pedal on the board, and one from the output of the last pedal to the amp. Now you also need to connect the power adapter to socket as well. Just one more cable!
And as usual you can complicate stuff even more, but I will not get into that now. Now it's time to sleep.
Rock on!!
Subscribe to:
Posts (Atom)